How to Add Visuals to Your Videos
Transform your talking head videos with engaging visuals. Add B-roll footage, overlay graphics, and custom text to make your content more dynamic and professional.
What You'll Learn
- Add visuals manually by selecting transcript text
- Use AI to automatically add B-rolls and text overlays
- Customize visual styles with themes and effects
- Manage multiple visuals with filtering options
- Control timing and positioning of visual elements
Understanding Visual Types
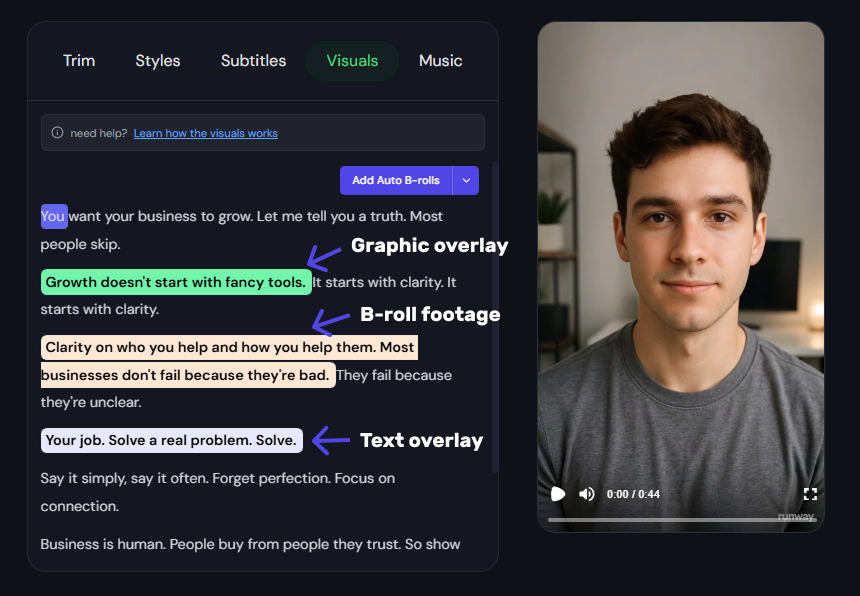 Example timeline showing B-Roll (orange), Overlay (green), Text Overlay (purple)
NextClip.pro offers three types of visuals, each with distinct background colors in your timeline:
B-Roll Footage (Orange background)
- Video clips that replace or complement your main video
- Perfect for illustrating concepts or adding visual interest
Overlay Graphics (Green background)
- Graphics, logos, icons that appear on top of your video
- Great for branding, emphasis, or decorative elements
Text Overlays (Purple background)
- Custom text that appears on screen
- Useful for highlighting key points or adding context
Method 1: Add Visuals Manually
 Selecting transcript text to add visuals
Step 1: Select Your Text
- Navigate to the Visuals tab
- Read through your transcript and identify where you want visuals
- Select the specific text where you want to add a visual
Step 2: Choose Visual Type
After selecting text, a menu appears with three options:
- Add B-roll
- Add Overlay
- Add Text
Step 3: Add B-Roll Footage
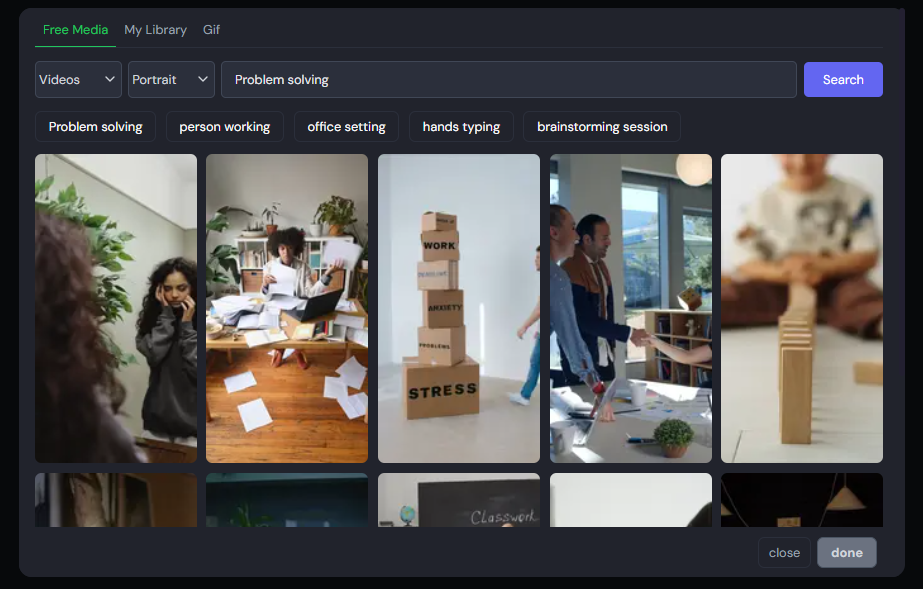 Choose footage from Pexels, Giphy, or your uploads
When you click "Add B-roll":
-
Media library opens with multiple sources:
- Pexels stock library - Professional video and image content
- Your uploaded media - Use your own files
- Giphy library - Animated GIFs
-
Search and filter options:
- Use provided search terms or enter your own
- Choose dimensions: Horizontal or Vertical
- Choose media type: Image or Video
-
Select your footage and click "Done"
Step 4: Customize B-Roll Style
Adjust B-roll styles, animations and sfx
The B-roll editing panel opens with:
Basic controls:
- Back button - Return to transcript view
- Hide Subtitle toggle - Show/hide captions during B-roll
- Video preview - See how it looks in real-time
- Replace Media - Choose different footage
- Start From - Set custom start point
Choose a theme (4 options):
- Simple-broll - B-roll appears full screen
- Broll-in-center - B-roll appears in center
- Half-broll - Screen split 50/50 between main video and B-roll
- Video-on-top - B-roll full screen with small main video overlay (like screen recordings)
Advanced customization:
- Dimensions - Adjust width, height, scale and more
- Position - Control placement on screen and more
- Transitions - Select enter/exit animations
- Overlay Transitions - Select enter/exit overlay transition like Film Burn
- Sound Effects - Select enter/exits Sound Effects
Step 5: Add Overlay Graphics
Process similar to B-roll but with graphic-specific options:
- Search for logos, icons, graphics
- Different styling options for graphics
- Animation options specific to overlays
Step 6: Add Custom Text
For text:
- Enter your custom text content
- Choose fonts, colors, and sizes etc.
- Select text animations and sound Effects
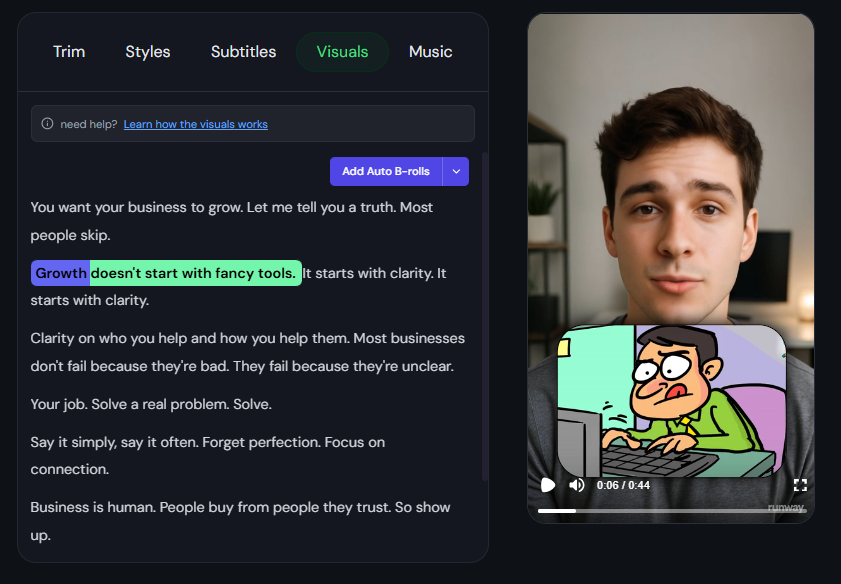
Method 2: Use AI Auto-Generation
Watch AI auto-generate B-Rolls and text overlays
Auto B-Rolls
Click "Add Auto B-rolls":
- AI analyzes your transcript content
- Automatically adds relevant B-roll footage to multiple sections
- Uses contextual understanding to match visuals with speech
Auto Text Overlays
Click the dropdown arrow next to "Add Auto B-rolls":
- Select "Add Auto Texts" from dropdown
- AI generates relevant text overlays throughout your video
- Adds emphasis and context automatically
Managing Your Visuals
Visual Filtering
Use the dropdown filter on the left:
- B-Roll, Overlay, Text - Toggle visibility of each type
- Unselected visuals still appear in video but hidden from timeline
- Helps reduce clutter when working with many visuals
Edit Existing Visuals
Click on any added visual to see options:
- Edit - Open the full editing panel
- Change Style - Apply saved custom styles
- Remove - Delete the visual
Adjust Timing
Drag visual elements to adjust duration:
- Drag from start - Change when visual begins
- Drag from end - Change when visual ends
Save Custom Styles
Create reusable presets:
- Customize theme, transitions, sound effects
- Save as custom style preset
- Apply to future visuals instantly
- Maintains consistency across your content
Best Practices
Example of clean, effective visuals vs cluttered visuals
Content Matching
For B-roll selection:
- Choose footage that supports your message
- Ensure visual quality matches your brand
- Consider pacing - faster cuts for energetic content
For overlays:
- Use consistently throughout video for branding
- Don't overcrowd the screen
- Ensure graphics complement rather than distract
For text overlays:
- Highlight key points and statistics
- Keep text concise and readable
- Use consistent styling for professional look
Final Checklist
Before completing your visuals:
- All visuals support and enhance your message
- Timing flows naturally with speech
- No visual clutter or overwhelming elements
- Brand consistency across all graphics
- Text overlays are readable and well-positioned
- B-roll quality matches your content standards
- Transitions enhance rather than distract
Next Steps
Your visuals are ready — time to publish!
Once your visuals are complete:
- Preview the entire video for flow and timing
- Continue to Music tab for audio enhancement
- Export your video with all visual elements embedded
- Your enhanced video is now ready for publication
Your video now has professional visuals that engage viewers and enhance your message delivery.

